
How to Make a Smoke Pouch
Whether it’s making amazing pulled pork, home-made jerky or simply adding a new dimension of subtle smoke flavour to some of your grilling go tos, a smoke pouch is a barbequer’s best friend.
 Let’s cover a few ground rules of building a smoke pouch. First of all, wood selection. Always, always, always use hard-wood. The most common are Hickory, Mesquite, Cherry, Apple, Maple or Oak (it’s Manitoba Oak you’re tasting at Lovey’s).
Thankfully you don’t need to be an arborist. Bags of the best hardwoods can now easily be found at most hardware stores. I’ve found them readily available at Rona, Home Depot and Canadian Tire, and they sell for a modest 3-6 bucks a pouch.
Some people like to play with wood recipes, blending Hickroy, Mesquite, and a fruit wood of some kind. But most of pros swear by Hickory.
Second of all, smoking is a low and slow cooking method. Well managed, indirect heat applied over long cooking times. In fact, true barbequing uses a detached smoker box to smoulder the wood of choice, sending the smoke and limited heat to a separate compartment that houses the meat.
Most of the so-called barbequing we do on our patios is grilling–direct, and fairly intense heat. That’s not to say you can’t apply your smoke pouch prowess to grilling, but more about that later.
Once you’ve selected your wood, you’re three easy steps away from a new level grilling goodness.
 Soak the Wood
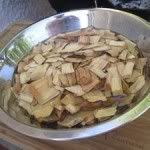 Soak 1/2 the wood chips in a bowl for at least 30 minutes. Some folks like to keep a container of soaked chips at their barbeque on an ongoing basis.
Soaking isn’t as important if you’re adding smoke to a grilled item like steak or burgers–there we want instant smoke and don’t care about burn time.
But for cooking methods like pulled pork or ribs, we need to slow down combustion, exposing the meat to smoke over the long haul.
Pulled pork takes at minimum 6 hours to cook, depending on size of cut. Many pit masters cook their cuts for 12-14 hours!
You don’t have to build one gigantic pouch. In fact, two pouches works best, exchanging the expended pouch for the new about half-way through the cooking process. But watch what you do with that discarded pouch. It’s hot, and although it’s only coals, it packs enough combustion power to do some damage.
 Build the Pouch
 Pull out a strip of tin foil twice the size of the pouch. We’re going to fold it back on itself to create an envelope.
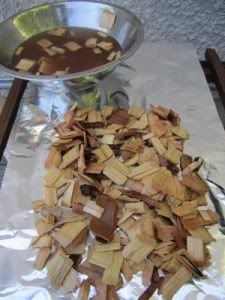
Place a handful or two of soaked chips in the centre of one end, leaving about 2 inches on the sides. Add an equal quantity of dry chips.
I like to toss the wet and dry together, others like to layer. The wet/dry blend gives the smoking a quick start as the dry chips will combust early in the cooking process. The wet ones will loose moisture and reach combustion point just as the dry ones burn out extending the life of your smoke pouch.
Once you’ve tossed your chips together (or not), fold the foil over the top and roll the top edge. Repeat for the sides until your pouch is sealed tight.
Use a fork, knife or anything pointy you have at hand and perforate one side of the pouch (this will be the top).
The holes do double duty. They allow the smoke to escape, obviously, but they also allow oxygen in. Too many holes, too much oxygen, and your smoke pouch will burn too fast.
SIDE NOTE: The soaked chips will have made a kind of tea. You can reserve this liquid and I’ve found by pouring it over my lava bricks when grilling, I can get add a cheep and cheerful hint of smoke into other items. You could alternately reserve it for soaking other chips in the future.
 Prep Your Grill
 Most grills have a split burner, and many have split cooking racks. Mine didn’t have the latter and if you find yourself in that camp, never fear, help is here.
Remove your cooking grate and hack it in half. Whatever it takes…hack saw, grinder, bolt cutter, whatever you have at hand, just do it.
Even if your partner is staring on in horror, mentally checking the account balance to see if you can afford a new barbeque because these projects always seem to result in the replacement of appliances (or is that just my household), forge on! You’re about to make your barbeque twice as useful.
When it’s time to smoke, remove half of your grilling grate…doesn’t matter which side, and drop your smoke pouch right on the coals.
If you’re cooking pulled pork, you’ll only light the burner under the smoke pouch, and put the meat on the cool side. Low and slow.
If you’re using your smoke pouch to impart flavour to chicken, burgers, steaks, there’s no cool side. You’ll be using the opposing grill to cook.
Either way, make sure the pouch is smoking before you add the meat. While there’s debate on the subject, I believe (and have learned from experience) that most of the smoke flavour is imparted early on. If your meat starts to sear before there’s smoke, it effectively creates a barrier which the smoke will have a hard time penetrating.
No comments yet.